Sunday, August 6, 2017

Enjoy the Journey Pillow

My newest pattern, Enjoy the Journey is now available for purchase on Ravelry!


Monday, January 9, 2017

Chemo Caps

I have an aunt who was recently diagnosed with breast cancer, and is starting her chemo treatment. I asked her if she would enjoy some knitted hats, and she said she would LOVE some! So I started scouring Ravelry for some extra cute hat patterns, as well as for suggestions from fellow knitters who have made chemo caps before.

Here are just a few of the tips I received (mostly from former chemo patients themselves):

#1: Don't use animal fiber yarn- Unless the recipient of the hat knows that they can handle it, don't use animal fiber yarn for chemo caps. I guess that chemotherapy makes patients skin extra sensitive, to where any animal fiber seems extremely itchy. In my aunt's case, she has super sensitive skin to begin with, so wool is a definite no. Most of the Ravelers I talked with suggested acrylic or cotton. I really don't like acrylic myself, either to work with or to wear, so I found a couple of nice cotton options (see below).

#2: Stay away from blacks, greys, yellows, and some greens- I don't know if this is true or not, but I was told that these colors don't look good on chemo patients. Since chemo gives their skin an 'ashy' look, these colors sometimes emphasize that. My aunt really wanted one of her hats in a grey yarn, however, so I'm going ahead and trying it. I found a pretty dark grey to work with, because I figured a darker grey would look livelier than a pale grey. I really hoping it works for her, but I figured the most important thing was letting her be involved in the process and pick the colors!

#3: Avoid patterns with openwork and lace- This one is pretty self-explanatory, since the point of a chemo cap is to cover up their scalp, not let it show!

#4: Make a 'just-for-fun' hat- Several of the former chemo-patients on Ravelry expressed that while sometimes they wanted to wear a hat that made them feel pretty or dressed nice, other times they just wanted to have fun and wear a silly hat! They suggested I find out what characters/movies my aunt likes, and try to make a themed hat based around that.

#5: Avoid seams- Again, pretty self-explanatory, but something I hadn't thought of before going on Ravelry. For extra-sensitive scalps, nobody wants a bulky seam to cause discomfort!

I hope these tips have helped any of you who are working on making some chemo caps!

My aunt picked out two hat styles for me to work on, but I'm hoping I can make even more than that! The first one is Ksenia. She wanted it just as pictured, with the gray and red. I decided to make it with Blue Sky Fibers Worsted Cotton.  It's 100% organic cotton yarn, and SO soft! I'm absolutely loving how it's working up with this hat, and am already thinking to make her more hats with the same yarn!


The second hat she picked out was the Caroline hat. I had made this hat previously, and my aunt decided to do those same colors. For this hat I decided to use Cascade Ultra Pima yarn. I've worked with this yarn before and love it, so I think it's going to turn out lovely for this hat! I haven't started on this one yet, but am really looking forward to it!


Wednesday, December 7, 2016

Vintage Aeroplane Pillow Pattern Sale

My Vintage Aeroplane pillow pattern is finally released on Ravelry! Use the coupon code 'aeroplanelaunch' to get it 25% off until December 31.


Friday, November 4, 2016

Oruga Pattern Sale

From now until November 12, get my new Oruga baby blanket pattern for 50% off, with the coupon code 'orugasale'!!!   :)


Tuesday, November 1, 2016

Vintage Aeroplane Pillow

I mentioned in a previous post that I was starting work on designing a pillow unlike any I've seen before.... Well it's all done, and currently in the process of being tested on Ravelry. I'm SO happy with how it turned out, and hope you all fall in love with it as well!

My nephew had a vintage-airplane themed 1st birthday recently, and I designed this for his present. It features a vintage bi-plane on the front, seed stitch borders, a fabric back, and a zipper in the bottom for easy removal. I've never tried to combine fabric with knitting before, and I've also never put a zipper in my knitting... So this was quite the new experience! Despite having to make it up as I went, I'm REALLY pleased with how it turned out, and this whole process has been making my brain churn with more possibilities for new patterns!

As soon as it's done being test-knitted, I'll be releasing this pattern for sale, hopefully in time for Christmas knitting!


Oruga Baby Blanket is Available!!!

My new pattern, Oruga, is now available for purchase on Ravelry!!!  I'm so excited about it, and hope you all love it as much as I do!  :)


Thursday, September 8, 2016

Oruga Baby Blanket

I'm super excited to be getting back into designing some knitting patterns!!! It's been a couple of years since I've been able to play around and design something myself, instead of just doing other people's patterns! I just finished this blanket, and am currently trying to get test-knitters for it on Ravelry (let me know if you want in on this, and I'll let you know how!).


It's knit with a super bulky chenille yarn, so it's SUPER cozy for a little one. Because of the chunky yarn, it's a relatively quick knit, and doesn't get boring like many baby blankets. It has a simple grid pattern, with lacy squares, stockinette squares, and seed stitch squares. Very simple, but so classy looking! 


As soon as I can get the pattern released, I will be posting a link on here! :)

(P.S. I'm also starting work on a pillow pattern that I'm SUPER excited about! I've never even seen a pattern quite like it, so it is completely experimental. I think it's going to turn out really well, and I can't wait for you all to see it!!!)

Tuesday, May 31, 2016

Pirate Ringo's Salsa

Non-knitting related post ahead! (unless you like eating chips and salsa while knitting.....) ;) 


I just wanted to take a minute and let you all know about a business venture my sis and her husband are trying to launch: Pirate Ringo's Salsa. My brother-in-law has made his own salsa for years, and has had many, many people tell him he should market it. So just within the last few months he's decided to try a go at it. They can only sell to friends and family currently, until they get licensed, so they have started a Kickstarter campaign to try and raise funds so they can get licensed faster, and then get the salsa in the hands of the public faster. Every salsa lover who has tried this stuff has raved about it, saying it's some of the best out there!

So if you're into salsa, please go check out their Kickstarter campaign, and consider making a donation to get this thing off the ground! You'll get freebies for your donation too.... everything from Christmas ornaments, tote bags, jars of salsa, oven mitts, t-shirts, and the ultimate- a signature Pirate Ringo's Salsa created in your honor and named after you!


On a side note.... aren't my niece and nephew the cutest little pirates ever??? ;)

Monday, December 29, 2014

Christmas Knitting

Now that Christmas is past, I can finally post about my knitted gifts! I only did two knitted gifts this year, and that was a good thing, because one of them I finished at 8:30 PM Christmas Eve. Talk about a close call! Both of the projects were pillows, from patterns I found on Ravelry.

The first one was an Aran Pillow for my sis and brother-in law. I've had this lovely Shetland wool sitting around for a long time, and it kept telling me it wanted to be made into something with cables. So I did! ;)  I was really pleased with how this turned out. I ended up sewing a pillow cover out of brown cotton to go under it, because at first, I could see the white pillow through the knitting. I didn't like that look, so I whipped up a pillow cover, and voila! it worked perfectly.


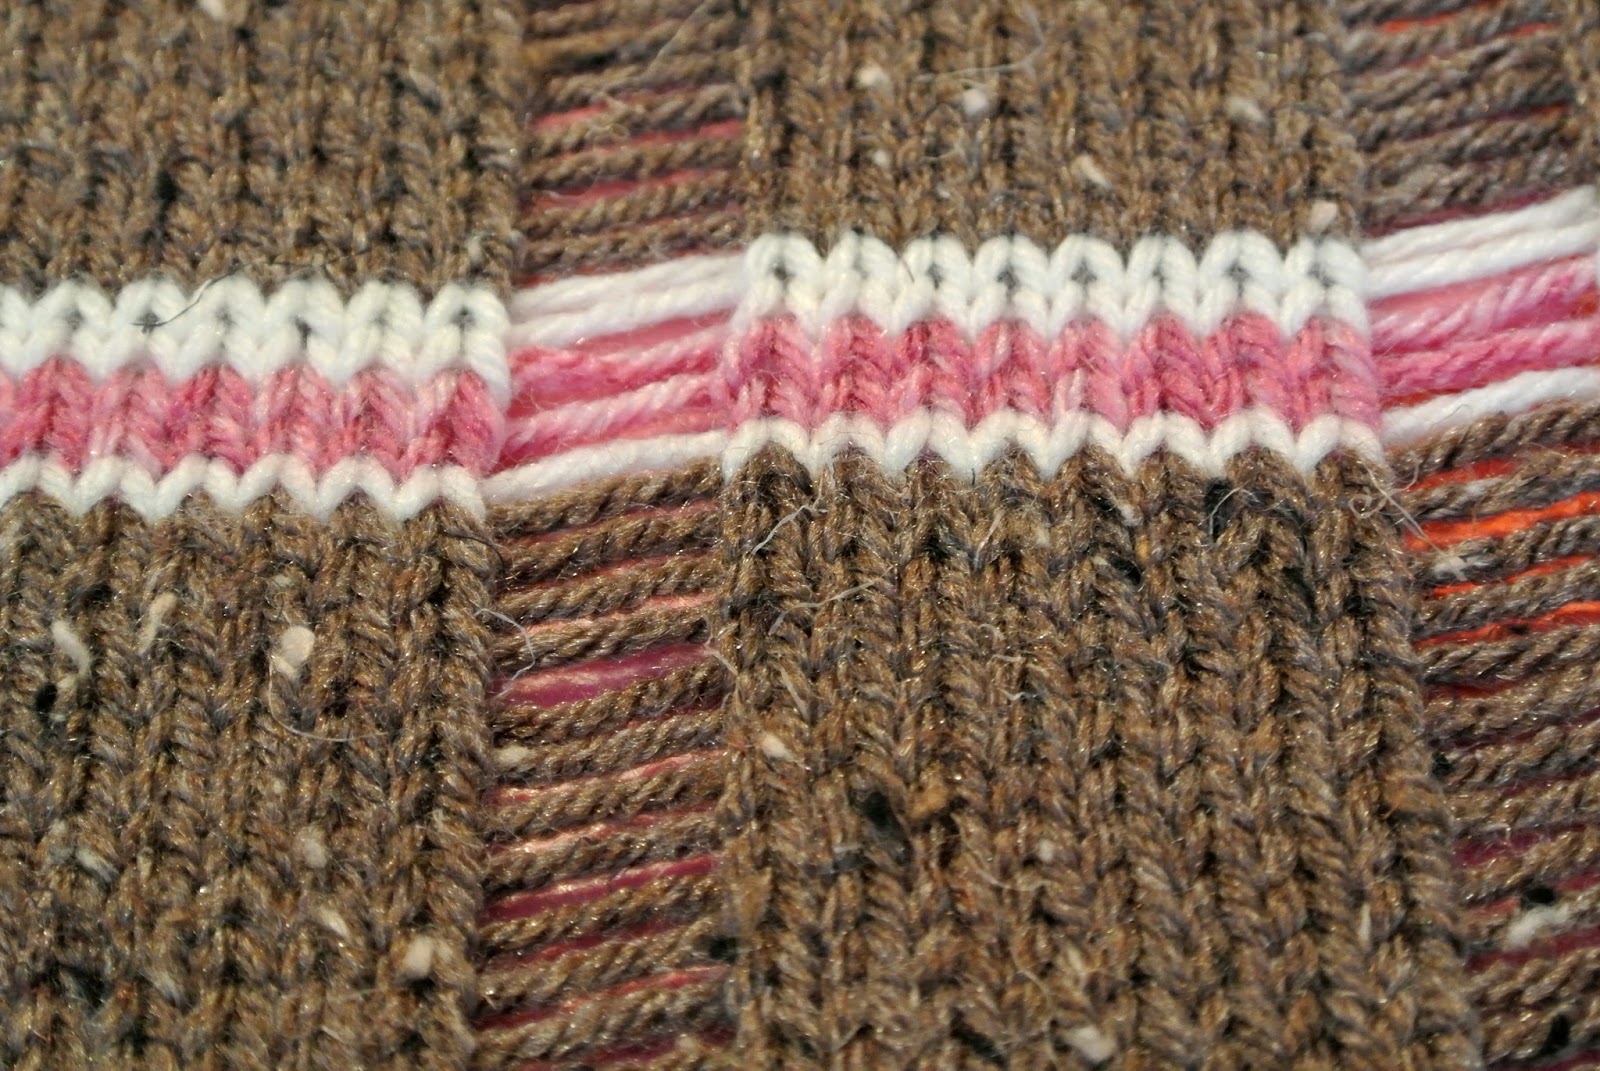
The second one (that was such a close call), was a Knit & Weave Pillow. I had never seen a technique like this before, so I decided to give it a try. I LOVE it! It's so unique compared to most knitted pillows. It gave me so many ideas on how to use this technique elsewhere! It was a much smaller pillow than I've done before (12"x12"), but it was the perfect size for this pattern. It made such a lovely little pillow to curl up with on a snowy night! ;)


Close-ups of the weaving.


So those were my Christmas knitting projects! I'm already thinking up gifts to start making for next year.... maybe I'll do a post about it soon.

Monday, August 4, 2014

Winter Knitting

I admit.... I'm already looking forward to fall and winter. Part of that might have to do with the high temperatures and extreme smoke we've had this summer. And part of it is because I'm one of those weird people who actually enjoy school, and I'm looking forward to starting my second year of college. But a big part of it is that I LOVE winter knitting. When I think about knitting in the winter, I imagine myself curling up with a latte and a blanket, and working on a nice chunky sweater. Or maybe I'm watching a movie with the family and knitting something for my little niece. Either way, winter knitting always makes me think of nice rich, dark shades of yarn, and projects that are filled with cables, seed stitch, and other lovely knitted textures. 

I'm already trying to plan what I'll knit this winter, and thought I'd share a few of my ideas with you.

I think my first choice would be DownEast. I love how chunky it is, the off-center cabling, the cowl-neck. Yep, I pretty much love everything about this sweater.

I just discovered Tinder on Ravelry today, and immediately favorited it. I love the texture of the pattern, and how cozy it looks.


Ease is a pattern that I've had in my favorites for a long time. I love sporty-looking patterns, and this one looks perfect for taking a run or hike in.


The color scheme of the Hollywell Cardigan were what made me fall in love with it. It looks super comfy, while looking trendy, too.


And last of all is the Mielie Vest. I love layering vests over my t-shirts in winter for extra warmth, and I love the style of this one.


So these are what I'm thinking about knitting right now. This list will probably change a dozen times before winter arrives, though, so I'll keep you all posted on what I decide!

Wednesday, February 19, 2014

Three Sisters Cowl

Three Sisters Cowl


Materials:

~8 mm 24” circular needle

~1 skein Blue Sky Alpacas Brushed Suri in Candied Apple

Gauge: 3 stitches per inch in stockinette stitch


NOTE: Remember when working in the round, you knit every row for stockinette stitch, and alternate knit and purl rows for garter stitch.


CO 85

Twist stitches once, before joining in the round.

Work 4 rows of garter stitch.

Work 8 rows of stockinette stitch.

Work 4 rows of garter stitch.

Work 8 rows of stockinette stitch.

Work 4 rows of garter stitch.

BO


Friday, January 11, 2013

Country Cables Mug Cozy Pattern


Country Cables Mug Cozy by Kaitlyn Johnson


Supplies:
~Mug with straight sides (3 in. diameter, 3 ¾ in. tall)
~Worsted weight yarn
~4.25mm (US 6) knitting needles
~G crochet hook
~¾ in. button

Abbreviations:
C6B: Slip next three sts onto cable needle and hold at back. K3, then K3 sts from cable needle.
C6F: Slip next three sts onto cable needle and hold at front. K3, then K3 sts from cable needle.

CO 19
K 6 rows
Row 7: K5, P9, K5
Row 8: K
Row 9: K5, P9, K5
Row 10: K8, C6B, K5
Rows 11-15: Rep. rows 7-8 twice, then row 7 once
Row 16: K5, C6F, K8
Rows 17-21: Rep. rows 7-8 twice, then row 7 once
Row 22: Rep. row 10

Repeat rows 11-22 four more times, then rows 11-16 once more
K 5 rows
BO, do not cut yarn, but leave last loop intact.

Using crochet hook, and last loop, chain 24
Slip stitch a couple times to opposite end of BO edge to secure chain, then slip stitch back along the chain and along the BO edge. Cut, fasten, and weave in ends.

Attach button in the center of CO edge about ½ in. from edge.

Thursday, December 20, 2012

Revised Seed Stitch Mug Cozy Pattern

Here is a revised pattern for my Seed Stitch Mug Cozy. I've tried to make the instructions clearer, and I'm including pics this time. Hopefully this helps! :)


Seed Stitch Mug Cozy Pattern by Kaitlyn Johnson

Supplies:
            -Mug with straight sides (3 in. diameter, 3 ¾ in. tall)
            -4.25 mm needles
            -G crochet hook
            -1 skein Impeccables yarn in black
            -7/8 in. button
           
Gauge (seed stitch): 5 sts/in.

Pattern:

CO 48 sts leaving a 12 in. tail


Row 1 (RS): (K1, P1) repeat to end of row
Row 2: (P1, K1) repeat to end of row

These two rows form seed stitch and are repeated through the end of the pattern.

Row 3: CO 4 sts, forming a tab, cont. in pattern to end of row


Continue in seed stitch for 3 ¼ in. or until piece is a little shorter than the mug, ending with a wrong side row.


CO, leaving the last loop intact and not cutting the yarn


Using crochet hook, chain 15


Beginning in tenth loop from hook, slip stitch down the chain and halfway down the side of the mug cozy.
Cut yarn and weave in on the wrong side.


Using cast-on tail, sew edge of tab to the opposite side of mug cozy, forming a circle with the cozy. Weave in on the back.


Sew button to the top corner of mug cozy opposite the crocheted loop. Weave in ends.


Put on mug and enjoy!


Monday, November 28, 2011

Seed Stitch Mug Cozy

Cup Circumference: 10 3/4 in.
Gauge: 5 stitches in 1 in. in seed stitch
4.25 mm needles
4.25 mm crochet hook
Bernat Softee Baby yarn 1 skein
6 leaf buttons

Cast on 48
Row 1 (right side): (k1, p1) repeat to end
Row 2 (wrong side): (p1, k1) repeat to end
These rows establish seed stitch
Row 3: BO 4 sts. forming a tab, cont. in seed stitch to end
Cont. in pattern for 3 in. or as desired, ending with a wrong side row.
BO all stitches, leave last loop intact, not cutting yarn.
Attach button on corner above tab.
Using the crochet hook, and the loop left after binding off, chain 10-11 sts. or enough to reach over the mug handle, and go around the button. Starting at the 7th chain from the hook, slip stitch back down the chain, and part way down the side of the mug cozy. Pull yarn through last slip stitch, and weave in.
Attach the tab to the opposite side of the cozy, making the cozy into a circle.
Weave in all ends.
Attach remaining buttons, scattered around.